What a trade-up contract is
A trade-up contract is an in-game tool that consumes ten weapon skins and produces a single new one. The rule is simple but strict: all ten inputs must share the same rarity tier, and the contract returns one skin from the tier directly above. You can never skip a tier, mix rarities, or use anything other than ten items. It's the only way in Counter-Strike 2 to deterministically convert skins you don't want into a shot at something rarer.
Because the output is a roll from a pool — not a guaranteed specific skin — a trade-up is part crafting, part gamble. Understanding the rarity ladder, the collection rules, the float maths and the odds is what separates a profitable craft from money set on fire.
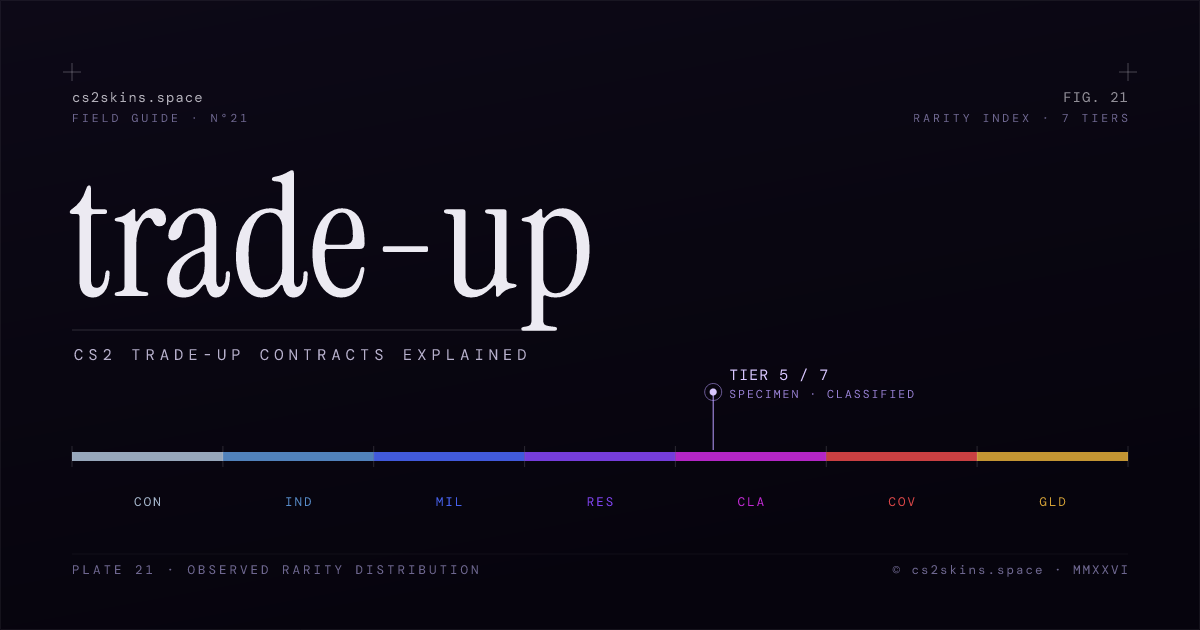
The rarity ladder
Every weapon skin sits in one of seven rarity tiers. Trade-ups climb this ladder one rung at a time:
- Consumer (white) → trades up to Industrial
- Industrial (light blue) → trades up to Mil-Spec
- Mil-Spec (blue) → trades up to Restricted
- Restricted (purple) → trades up to Classified
- Classified (pink) → trades up to Covert
- Covert (red) → the top tradeable tier; nothing higher
Covert is the ceiling. There is no trade-up path beyond red, which means knives and gloves can never be obtained through a contract— they live in a special tier that the system simply won't produce. If you want a blade, you're buying it or unboxing it, not crafting it. For the full vocabulary, our CS2 skins glossary defines each tier.
Step 1 — Pick your target output
Good trade-ups start at the finish line. Decide which specific higher-tier skin you actually want — say a particular Restricted rifle — and work backwards. Targeting an output first lets you pick input collections that funnel the odds toward it instead of scattering your chances across skins you don't care about.
Browse the tier you're aiming for and note its value. Our collections pages and skins catalog list every finish with its live price across our multi-market grid, so you can see at a glance whether a given output is worth chasing before you spend a cent on inputs.
Step 2 — Gather 10 same-rarity inputs from the right collections
Now buy ten inputs, all of the same rarity. The catch most people miss: every input must come from a collection that actually contains a skin one tier higher. If a collection tops out at the rarity you're feeding in, it contributes nothing to the output pool — and worse, it dilutes your odds.
The output pool is the set of all next-tier skins across the collections your ten inputs belong to. So if all ten inputs come from a single collection, every possible output comes from that one collection. Mix collections and you mix the possible outputs. This is the single biggest lever you control, which is why our collections pages are the planning tool that matters most here.
Step 3 — Work out the output float
The output's wear isn't random. The game takes the average of all ten input float values and maps that average into the output skin's own minimum-to-maximum float range. Lower input floats give a lower output float, which usually means a cleaner, more valuable result.
A simple worked example. Suppose your ten inputs average a float around 0.06 — clean Minimal-Wear territory. If the output skin has a float range that spans roughly 0.00 to 0.50, that 0.06 average lands near the bottom of its range, producing a low-float, near-pristine output. Feed in worn, high-float inputs instead and the same contract spits out a battered copy. Because each possible output skin has different float caps, the identical input average can produce different wear tiers depending on which skin you actually roll — something to plan around when value depends on hitting Factory New. If you want the full mechanics, see our float value guide.
Step 4 — Check the odds (they're collection-weighted)
Output odds are not a flat coin-flip across the pool — they're weighted by how many inputs each collection contributes. Each of your ten inputs effectively casts one "ticket." The chance of landing in a given collection's next-tier outputs is proportional to how many of your ten inputs came from that collection; within that collection, the eligible next-tier skins share the odds equally.
The practical takeaway: if you want a specific output, load as many of your ten inputs as possible from its collection. Ten inputs from one collection means 100% of your roll lands in that collection's next-tier pool. Split five and five between two collections and you halve your weighting toward each. Every input you spend on the "wrong" collection is odds bled away from your target.
Step 5 — Compare cost versus expected value
Before you click, do the maths. Add up what the ten inputs cost you, then estimate the expected value (EV) of the output — the average price of every skin you might receive, weighted by its odds. If the cost of inputs exceeds the EV of the output, the contract loses money on average.
This is why most random trade-ups are unprofitable. You pay a buy/sell spread on all ten inputs and on selling the output, and the next-tier pool usually contains more cheap skins than expensive ones. The cheap outcomes drag the EV below your input cost. A trade-up only makes sense when you've deliberately stacked the odds toward a high-value output and sourced inputs cheaply enough that the numbers clear the spread.
Float-farming and StatTrak
The pros squeeze profit through float-farming: buying the cheapest possible low-float inputs so the averaged output lands at a pristine, high-demand wear. A Factory New output can be worth many times its worn equivalent, so a few cents extra per input for a lower float can transform the EV. The cheapest low-float inputs often hide in unpopular collections, which is exactly where patient crafters dig.
One more rule worth knowing: StatTrak inputs produce a StatTrak output — but only if all ten inputs are StatTrak. You can't mix StatTrak and regular skins in the same contract. StatTrak trade-ups draw from a separate pool and can carry their own premium, so price them out the same way before committing.
The risks
Trade-ups are irreversible. Once you commit, the ten inputs are gone and you're locked to whatever the roll gives you. The main risks are: paying more for inputs than the output pool is worth; rolling a low-value or high-float output you can't sell for a profit; and misreading the collection weighting so your odds toward the target are thinner than you assumed. Volatile prices make it worse — an output that looked profitable last week can sink below your input cost by the time you sell. Never craft on vibes; craft on numbers you've checked against case odds and EV thinking.
How to plan a trade-up with our tools
Planning beats luck. Use our collections pages to see exactly which skins sit one tier above your inputs, then price every candidate output on the skins catalog, where each finish shows a live price from our own in-house valuation algorithm — a multi-market price grid spanning dozens of marketplaces. Check input costs the same way, including the cheap low-float copies that make float-farming work.
From there it's arithmetic: total input cost versus odds-weighted output value. If you're hunting rifle or AWP targets, our AK-47 buying guide and AWP buying guide help you judge which finishes hold value, and the broader guides hub covers the rest. Plan the output, stack the collection weighting, farm low floats, run the EV — and only then pull the trigger.